
How to read and use a sewing pattern - Patterns 101
You want to get into sewing garments apparel? Sewing patterns is a great way to introduce yourself to the world of sewing.
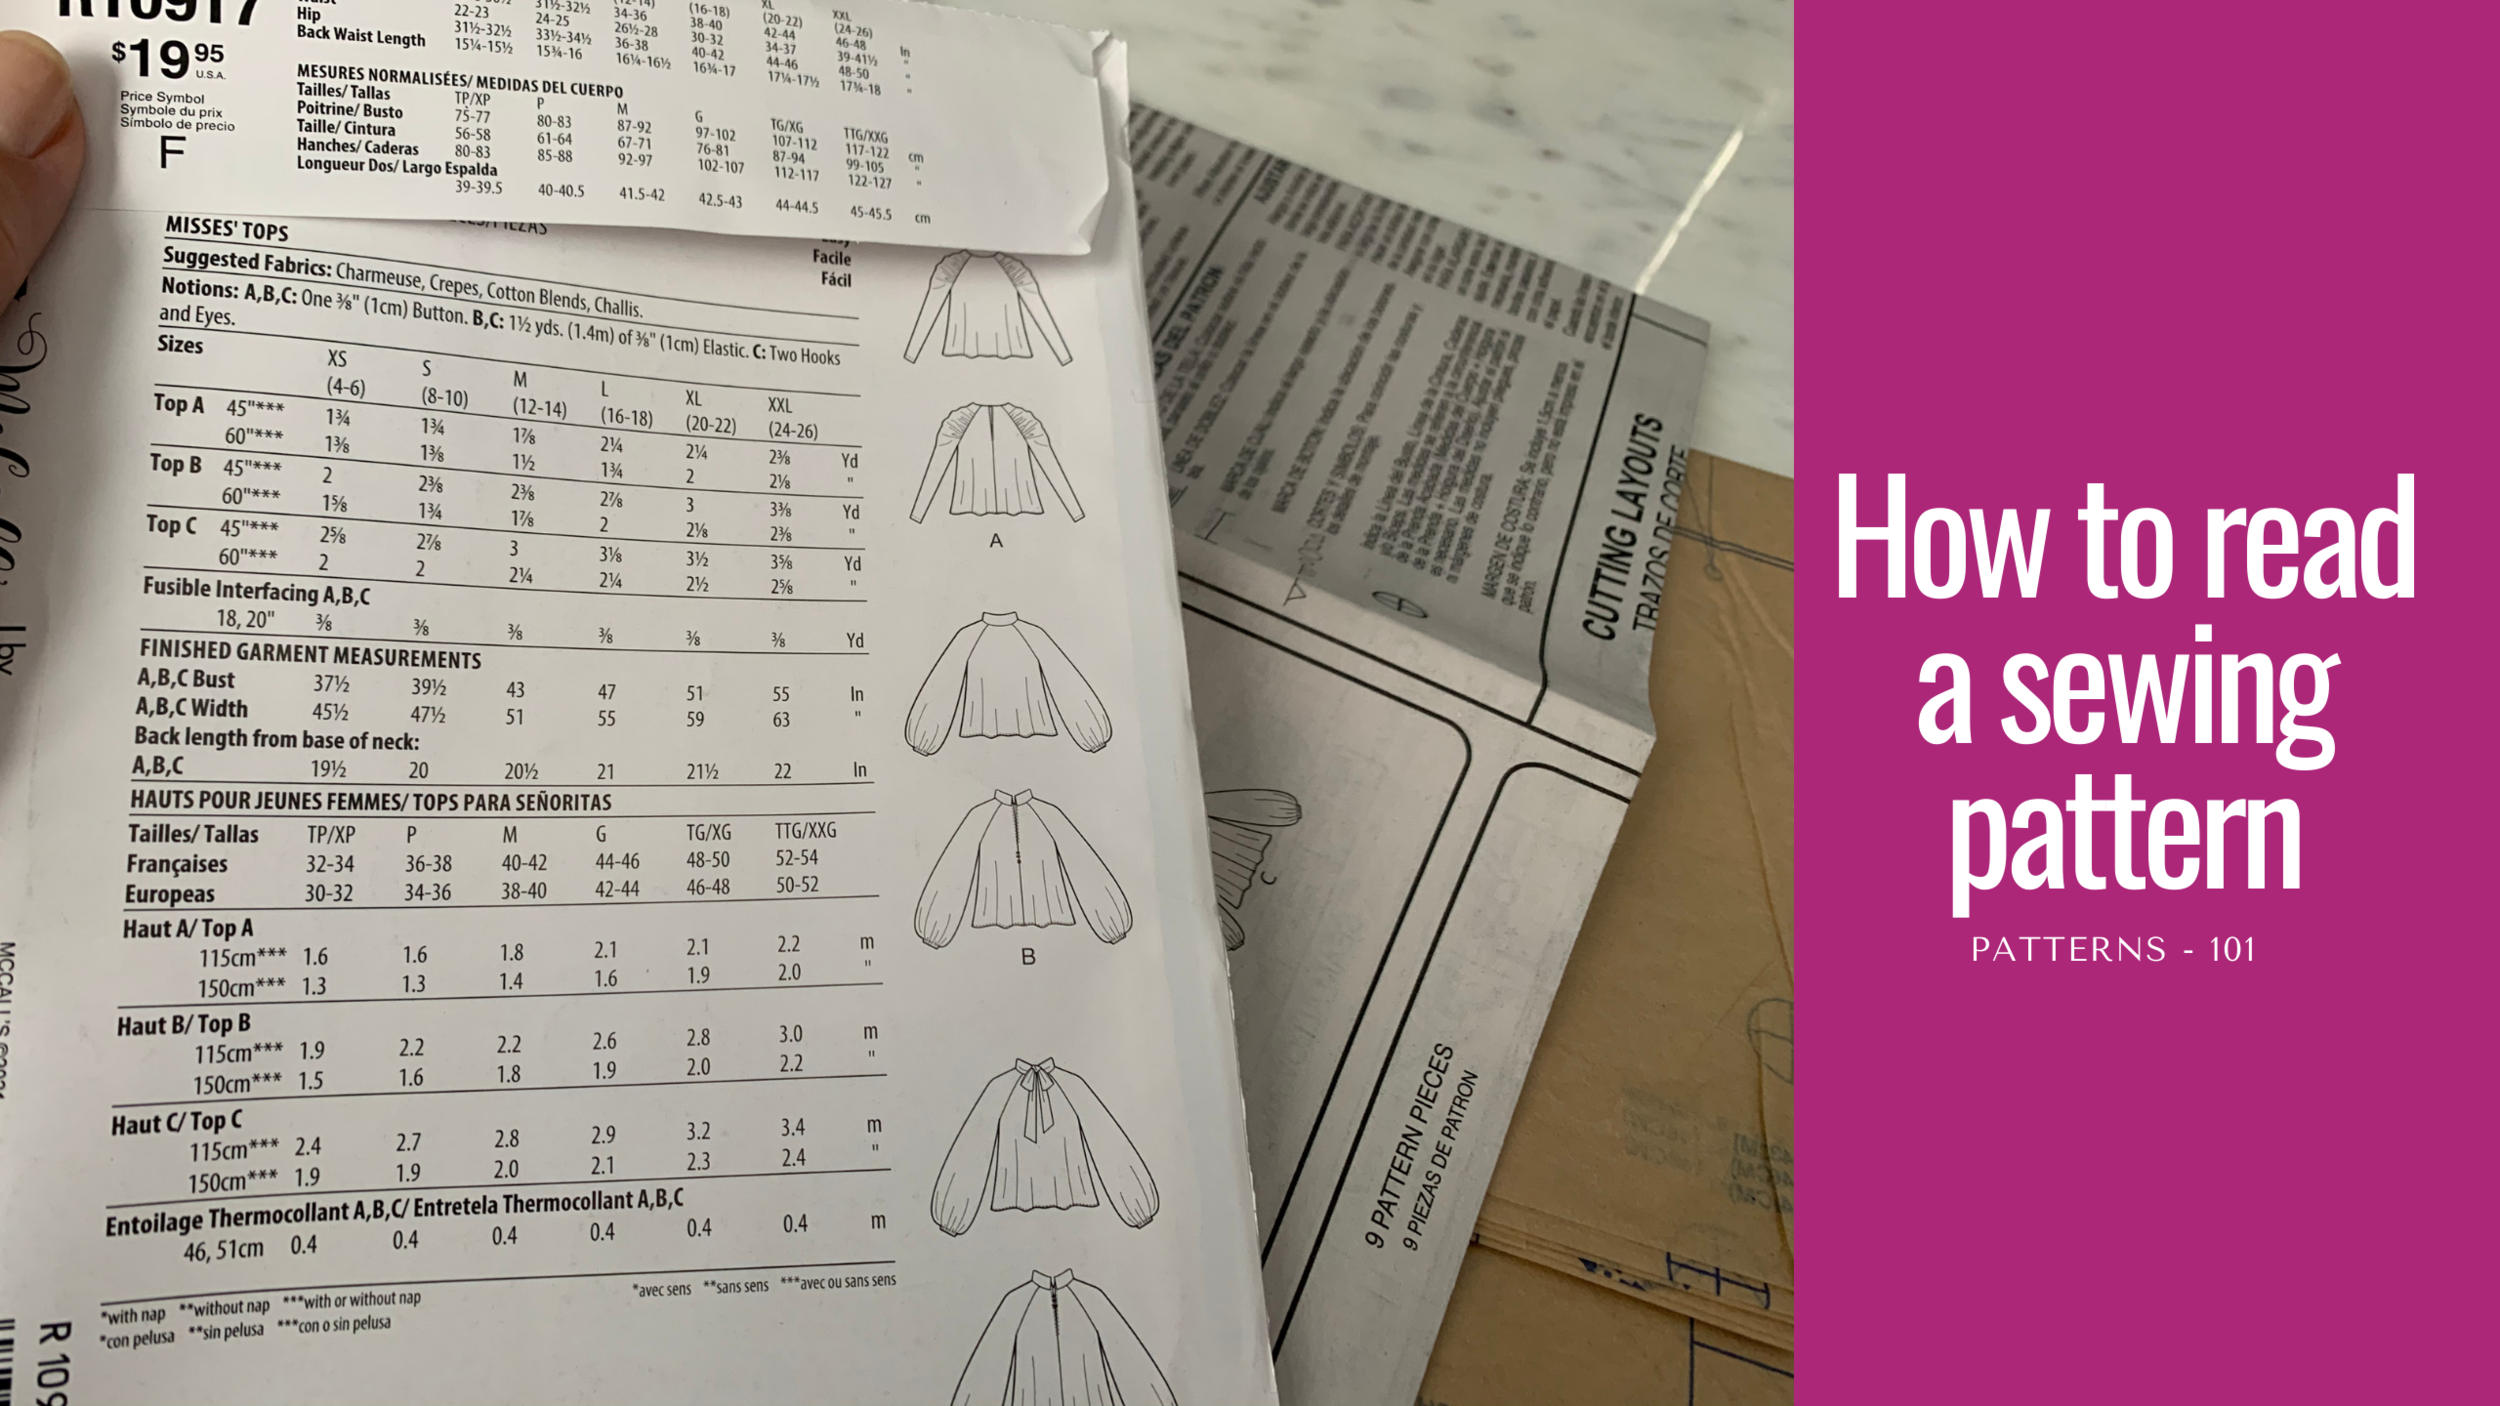
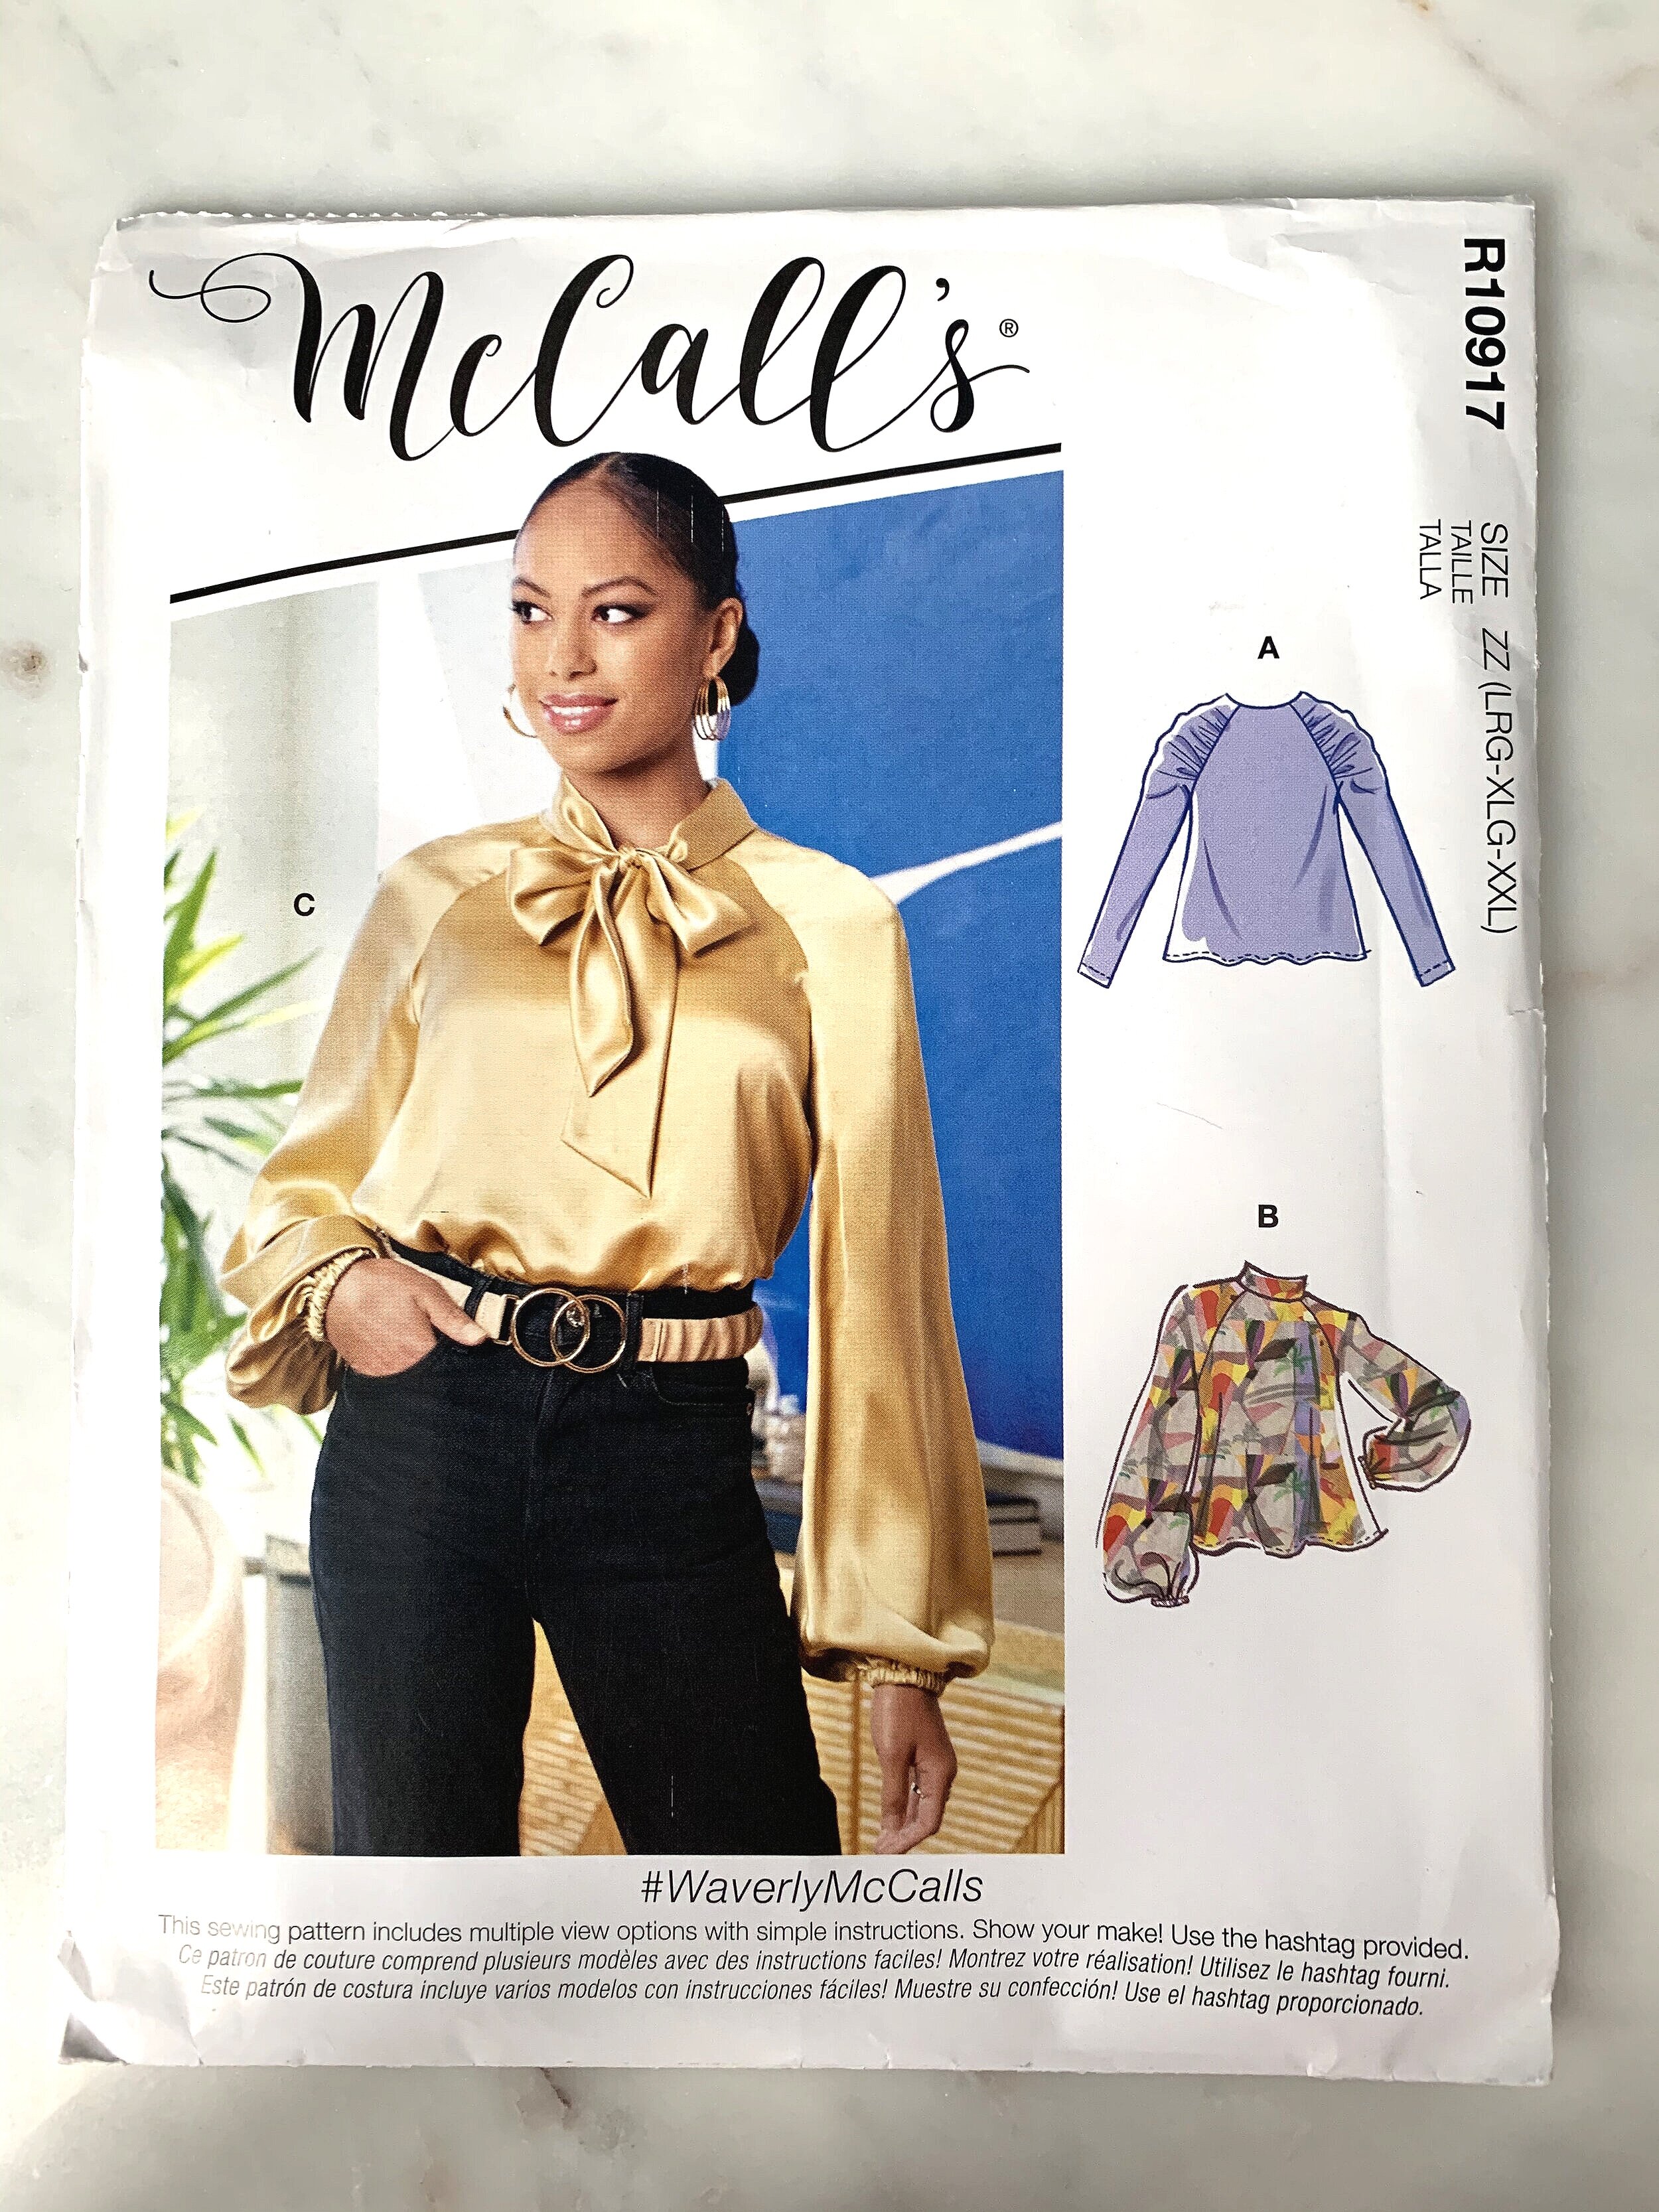
Let’s look at the pattern below from McCalls Early Spring 2021. It is sewing pattern M8147 or Waverly McCalls. The picture also has a pattern number of R10917 and that is a number pattern companies give this pattern so it is shown on a rack and it’s the first thing you see when you go to browse patterns. This pattern will be inside the pattern drawers marked as “M8147”.
Know your measurements
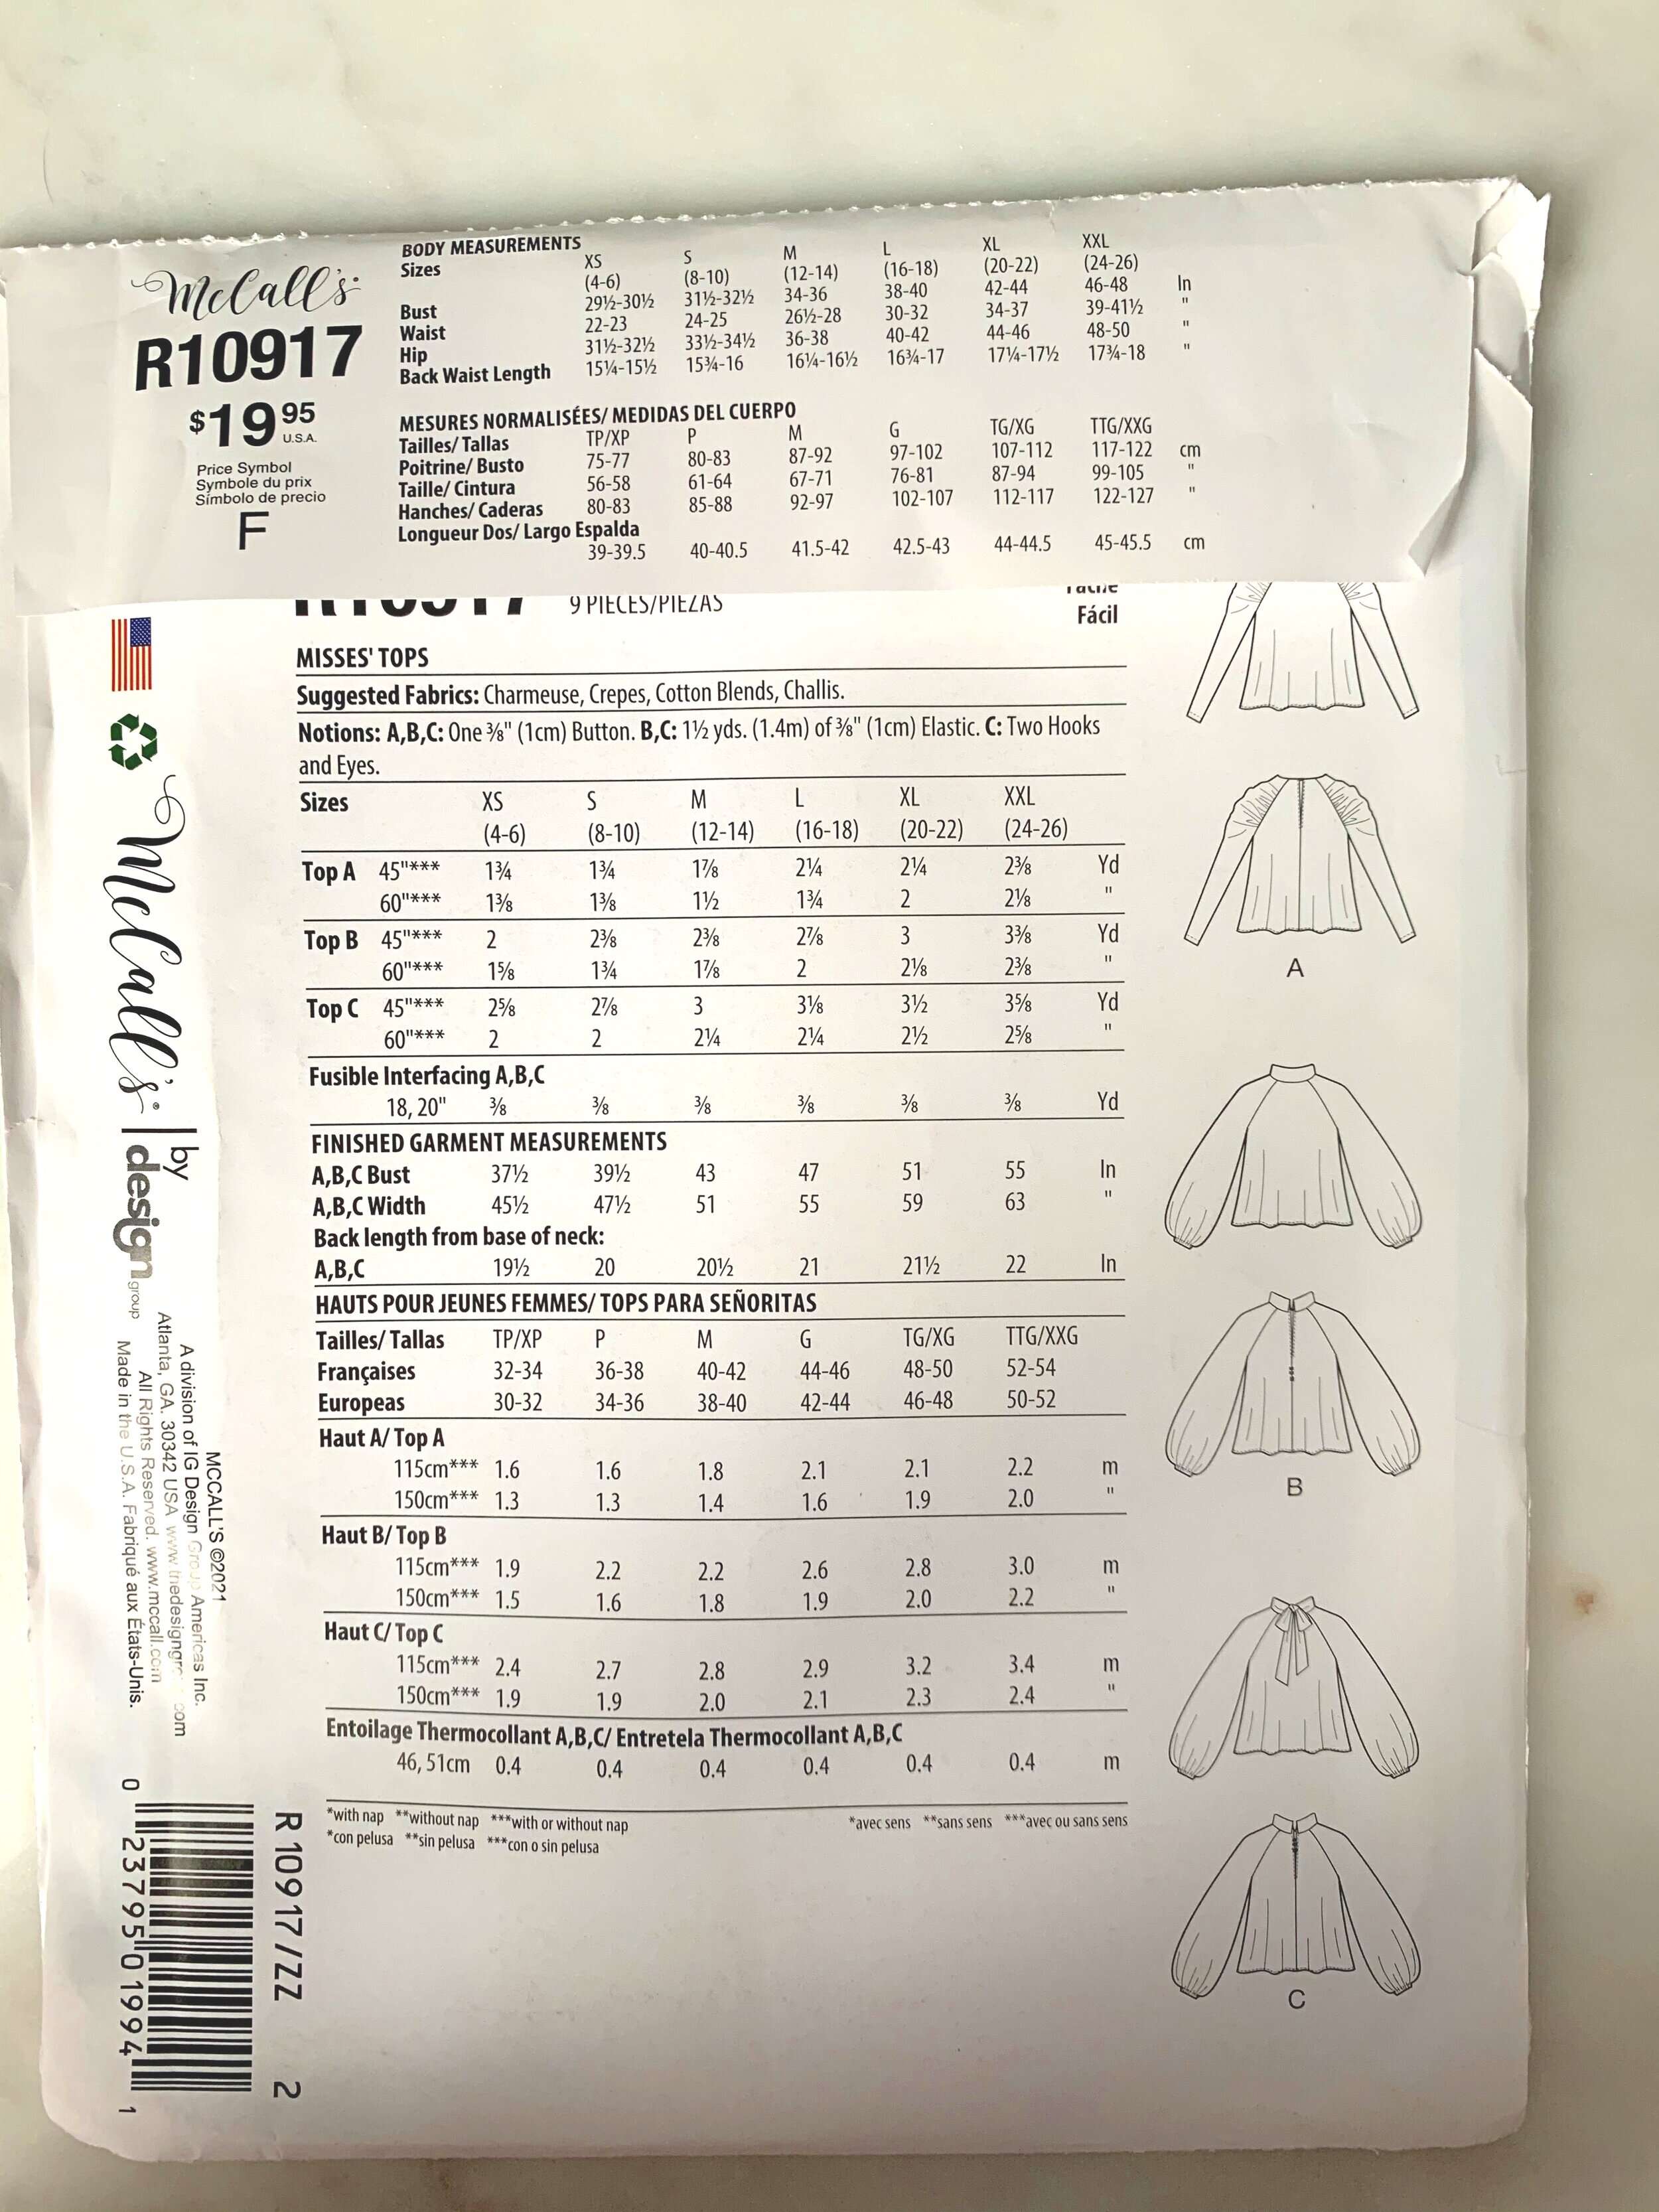
Before you can select a pattern, you should know your bust, waist and hip measurements (or whomever will be wearing the finished garment). The Body Measurements on the top flap have the measurements range that will fit the pattern. Since this pattern is packed in two different envelopes (XS, S, M) and (L, XL, XXL) you want to make sure you select the correct one based on your body measurements. The patterns use either inches or centimeters.
The measurements that you find in the back of a sewing pattern are not the same as ready-to-wear clothing so buyers beware you have to know your body measurements. If you are a 10 in RTW you might be a size 16 in a commercial sewing pattern. Don’t worry about the number, you want to make sure you select the correct pattern for your corresponding size. Can we just say when did RTW started with the vanity sizing?
How many pieces and Sewing Rating?
For this pattern it says that you have 9 pieces and that it is rated as an easy to sew pattern. This will help you select a pattern that you are comfortable sewing and will not become overwhelming if you are a beginner.
Suggested Fabrics
Waverly McCalls has Charmeuse, Crepes, Cotton Blends and Challis as a suggested fabric. These fabrics will all have a good drape and will give you the finished garment look as its shown on the front of the envelope. If you don’t know what those fabrics feel like, ask the salesperson at your local fabric store, they should be able to point out these types of fabrics. If you are a beginner I would suggest that you try a Cotton Blend with this pattern, it will be the easiest fabric to work with while you sew with it.
Notions
The pattern lets you know what other items you will need to create this garment. For example, for View C besides fabric you will also need two hooks and eyes… Some patterns have this listed and other don’t, like this pattern but don’t leave the store without matching thread! The notions section will also tell you if you need zippers, buttons, bias tape, etc.
How much fabric will you need?
As you keep going down the pattern you will also have a chart that outlines how much fabric you will need to make this pattern. For Waverly McCalls View C it looks like you are going to need 3-1/8 yards - if the bolt of fabric is 45” OR 2-1/4 yards if the bolt of fabric is 60” so when you are at the fabric store make sure you buy enough fabric. Lately I’ve noticed that some bolts are 57” or 42” so make sure you get enough fabric. I tend to buy just a tad more (to be safe!) sometimes a 1/4 yard or perhaps 1/2 yard extra.
If you keep reading it looks like you will also need fusible interfacing…. 3/8 of a yard. So make sure you have enough because you will need it to interface pattern pieces like collars or cuffs.
Finished Garment Measurements
We had body measurements and now finished garment measurements? What’s the difference? Well body measurements is the measurement that the pattern designer created so for your body measurement it fits with the intended fit (some are more loose and others are more fitted). So finished garment measurement means that when your garment is finished the large size will have a bust measurement of 47 inches. If you like your clothing to be more fitted or looser this is the place to look because it will be the difference between a garment that is perhaps too big or too small. If the finished garment measurements are not printed in the outer envelope they will be marked on the pattern tissue itself.
Later this week we will open up the envelope and dive into the instruction and the tissue paper pattern!

Working with Knit Fabrics

If you are working with knits there are a few things to keep in mind. Here are some tips and tools to help you tackle working with knit fabrics and set yourself up for success and avoid frustrations.
Walking Presser Foot
This presser foot is a game changer, life changer whatever you want to call it, but it makes sewing with knit fabrics so much easier as it helps to feed the fabric on your sewing machine from the top, whilst your sewing machine helps it feed it from the bottom. Cue the angels music! Knits stretch and when you are sewing with them with a regular foot they will stretch but this presser foot helps. Check your sewing manufacturer for their recommendations but here is a walking foot link for the one in the video.
Sewing Needles
Use the right sewing needles for the fabric that you are sewing. Not only is it important that you use the correct sewing machine needle for the fabric you are using but also that you also change them after sewing with them. Machine needles get dull over time with usage, so not only use the right needle for the fabric but after a while, change it too. Sewing needles break and the last thing you want is a sharp broken needle tip near your face or your eyes. So change those needles!
For knit fabrics we recommend either Jersey needles (aka ballpoint needles), Stretch needles or Universal sewing needles. It also depends if you are sewing with lightweight fabrics, mid weight to heavier knits. Schmetz has a great Schmetz Needles app you can download, Look for the fabric you are sewing and they give you the size of the needle to use. It doesn’t get any easier than that.
Straight or Zig Zag stitch?
You want to use a zig zag stitch when you are working with knits. Why? Well knits stretch and if you use a straight stitch eventually your stitches will break. Bummer! In the video I explain when you can use a straight stitch when working with knits BUT if you are new and when in doubt just use a zig zag stitch that is between 2.5 to 3mm long.
Finishing your Raw Edges and Seam allowances
The good news is that knits do not unravel like a woven fabric would, which means you don’t have to finish your seam allowances. But if you are like me and like to see a finished seams to your garment then you can either use a set of pinking shears to trim your seam allowances. Another option is to trim and use a zig zag stitch to finish your seam allowances. Last but not least you can also use a serger (or overlocker) to trim and serge your seam allowances. It requires a different machine, you don’t need one but if you can invest in one I highly recommend that you do.
Do you want to learn more about sewing with knit fabrics? I highly recommend a book by Tilly Wallnes called “Stretch - Make Yourself Comfortable Sewing with Knit Fabrics” It has lots of tips, illustrations and knit fabric patterns.
As an Amazon Associate I earn from qualifying purchases. What the heck does that mean?! It means that if you click on the links above and you make a purchase I earn a small commission from it.

Pumpkin Pie with a Puerto Rican twist
The leaves are changing, and it is without a doubt fall weather. Put your summer pies to bed because it’s time to crack those cans of pumpkin puree open. Pumpkin pie is a huge hit at our house, and I mean big hit. It warms up the house, it makes everything smell amazing, and at the end you get a slice of pumpkin pie.
So here is my famous pumpkin recipe. I’ve always felt it has a Puerto Rican twist because I forgo the sugar and just go straight for the sweetened condensed milk.
Pie Crust enough for a pie dish.
1 -15 ounce can of pumpkin puree. I love Libby’s 100% pumpkin puree. You can also make pumpkin puree from scratch but Libby makes a great product so that’s what I like to use.
2 large eggs
1 can of sweetened condensed milk
1 tsp of ground cinnamon
1/4 tsp of nutmeg
1/4 tsp of allspice
In lieu of all these spices you can also use Pumpkin Pie Spice (its a combination of all of them), I use McCormick spices but you can use any brand.
In a separate bowl mix of all the ingredients until they are well mixed. Pour in a 9” pie baking dish with an uncooked pie crust.
Bake for 50 to 60 minutes or until a toothpick comes out clean.
Let the pie cool down and serve with a dollop of whip cream, If you like to kick it up a notch add 1/2 tsp of dulce the leche along with that dollop of whip cream! It’s absolutely delicious.

As an Amazon Associate I earn from qualifying purchases. What the heck does that mean?! It means that if you click on the links above and you make a purchase I earn a small commission from it.

Homemade Tomato Sauce
There is no denying that it is fall, Warm sunny days and cool nights, its my favorite time of the year and we get to enjoy those beautiful fall days. With that my tomato plants are as I like to say “on fire” and they are pumping so many tomatoes that I can’t keep up. So what to do with the plethora of tomatoes that I have? Tomato sauce!
I have a mix of cherry tomatoes, heirloom, tomatoes and beefsteak tomatoes! The hubby went overboard planting tomato plants and well, here I am ready to make tomato sauce that I can store and use later on. Its great to use on homemade pizza, or a simple pasta dish the kids can enjoy when I don’t have time to create a full blown meal.
Ingredients
Tomatoes - I have a mix of tomatoes but you can use any kind at hand. For this recipe I’m using around 1 pound of tomatoes. Make sure to wash your tomatoes!
4 Garlic cloves- minced
1 tsp - Italian Seasonings
1 tsp - Red Pepper Flakes
1 tbsp - Olive oil
Salt and pepper to taste
Cut up all the tomatoes in smaller 1 inch pieces. In a skillet heat up the minced garlic and olive oil until it barely starts browning, add all the ingredients along with salt and pepper to taste.

Whole tomatoes on a skillet
On medium heat, let the tomatoes and seasonings mixture cook for the 30 to 35 minutes until the sauce reduces. Gently smash any cherry tomatoes so they release all the tomato juice. The mixture will reduce over time and the water from the tomatoes will evaporate and you will have a thicker sauce consistency.

Once the sauce is done, take it off the heat and now its ready to use. I usually save it for later, so I save it on ball jars. I fill the jars while the sauce is still hot, leave a 1/2” gap at the top and close them with the lids. I leave it on the countertop to cool off, once the happens the jar seals itself. I keep my sauce refrigerated because we tend to use it throughout the week!

Fill it up and I leave about 1/2” gap from the top.
Voila! Its ready to use!

See the top of the jar? It sealed itself as it cooled off.
Do you can any fruits or vegetables that grow in your home? Tell me about it in the comments.
As an Amazon Associate I earn from qualifying purchases. What the heck does that mean?! It means that if you click on the links above and you make a purchase I earn a small commission from it.
Masson… a builder of many things.
It is in those quiet times when you get inspired to write and adversity makes you think of what is truly important in life. Hence why the name Masson Lifestyle. This blog is about the life I’ve built with my family in our modest home. A place were we cook, laugh, live and enjoy being together. We still have so much to renovate in this house, and after ten years of living in it, it still needs a little “reno” love. So let me walk you thru it as we update this home, where we cook, sew and also were we design a life well lived.

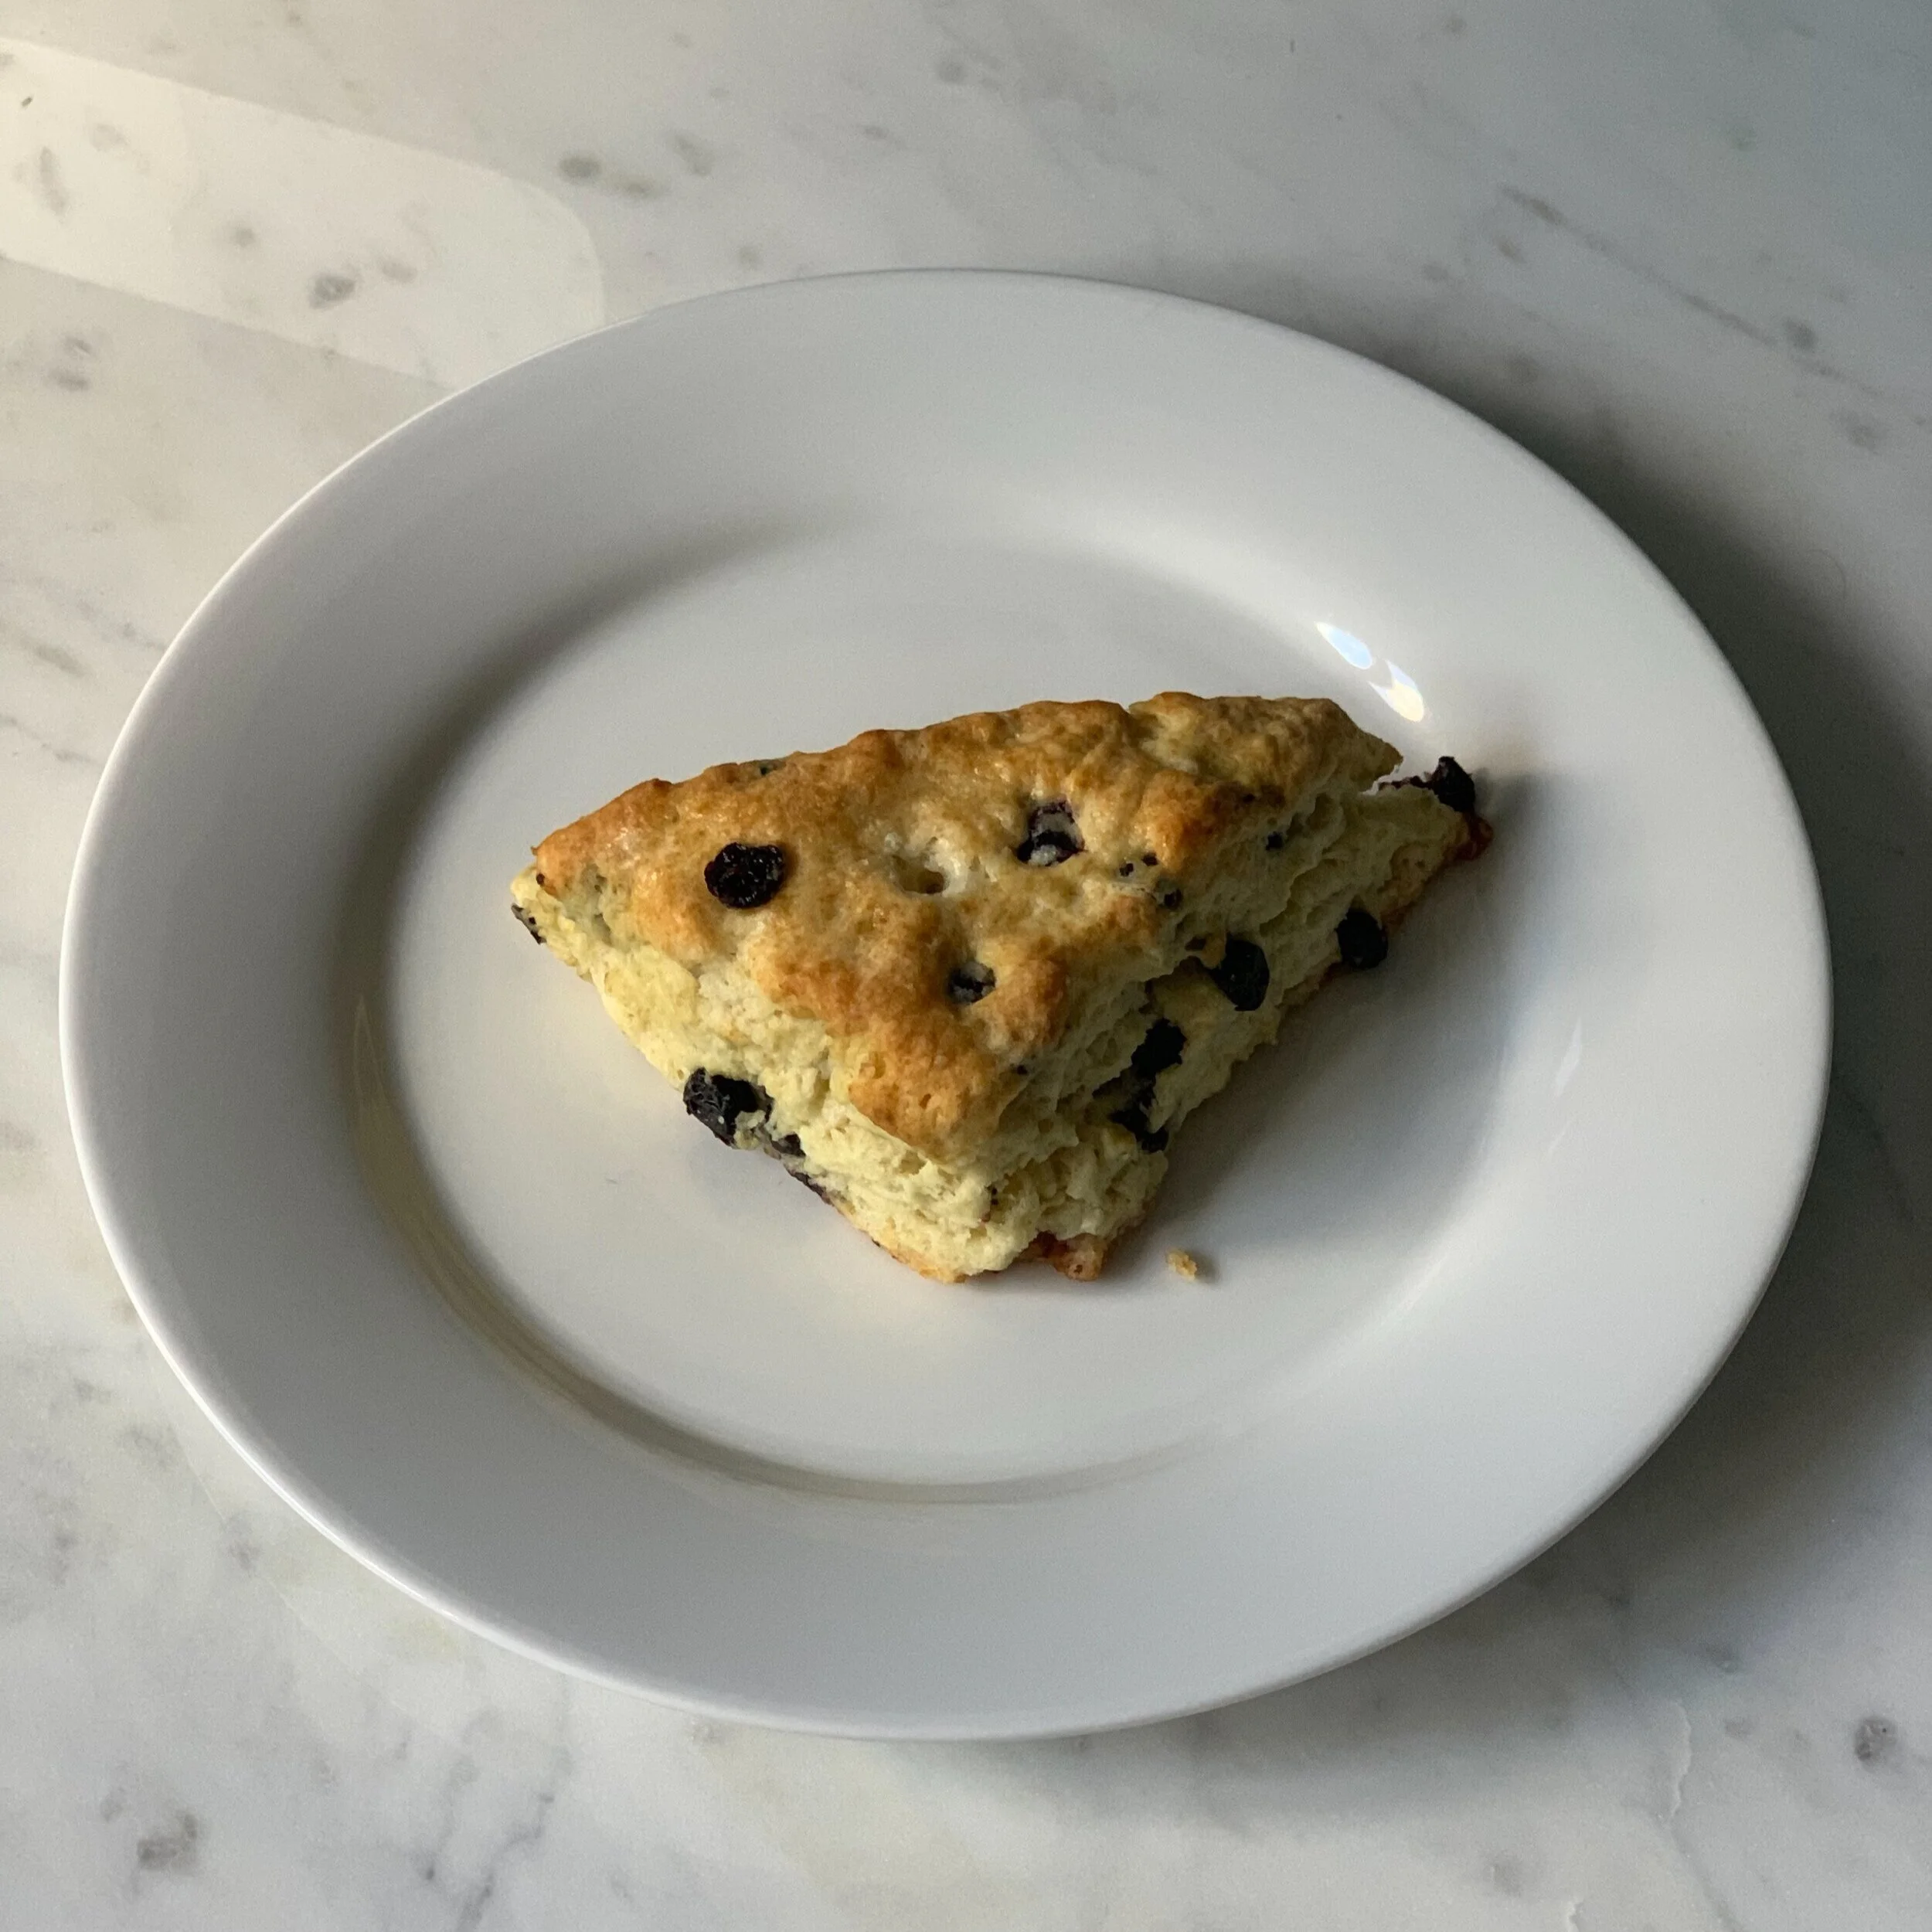
Blueberry Scones
A quick breakfast scone recipe to make ahead of time and enjoy during the week.
I don’t know about you, but I rather get in some extra sleep than cook a full blown breakfast before I have to jet out the door. I want to make sure the kids get some sort of food before they head to school and I need to eat something before I get a workout. We have made these countless of times. It’s a quick and easy breakfast to make at home. You can store it for a few days (2 to 3 days tops!) or enjoy it all at once.
2 cups of all purpose flour
2 tablespoons of baking powder
1 1/2 sticks of cold butter , 1/2-inch diced. I highly recommend Plugra butter. It has a higher fat content which means you get more flavor.
1/2 cup of dried blueberries, I get mine at Trader Joe’s. If you don’t care for blueberries you can substitute with one cup of semi- sweet chocolate chips
2 eggs
1/2 cup of cold heavy cream
1/2 tsp of salt
Preheat the oven to 400 degrees and get a baking sheet off to the side to set your scones once they are made. You don’t need to grease the baking sheet!
In the bowl of an electric mixer coming the flour, baking powder, salt, blueberries, and cold butter.

Add all the dried ingredients to the mixer
On a separate bowl, mix the eggs and the cold whipping cream. With the mixer on low speed add in the mixture of eggs and heavy cream. Mix until its just blended. You want to keep some of those butter chunks in there. Save at least a tablespoon of the wet ingredients, you will need it for an egg wash and I’m warning you now…the dough will be a little sticky.

Dump the mixture in a lightly floured wooden board. Roll the dough until its between 3/4” to 1” thick. I usually create one big rectangle with the dough and cut the dough into triangles and set on the baking sheet. Brush the top with an egg wash and sprinkle a little sugar.

Dough flattened to 1/2” thick rectangle, Cut into 12 triangles.

Brush your triangle pieces with a little bit of egg wash.
Bake for 14 to 18 minutes until the scones are lightly browned and the inside if fully baked.

Serve warm with a cup of coffee, eat by itself or add some clotted cream and jam, or save for later!
As an Amazon Associate I earn from qualifying purchases. What the heck does that mean?! It means that if you click on the links above and you make a purchase I earn a small commission from it.
Subscribe to our newsletter.
Sign up with your email address to receive news and updates.